Eyelash Curlers 101: Get Lifted, Wide-Awake Eyes with Glow16
Introduction: The Small Tool That Opens Up Your Whole Face
Ever noticed how some makeup looks instantly polished, even with just kajol and mascara? Chances are the lashes were curled. An eyelash curler is one of the smallest, most affordable tools in your makeup bag, yet it can make your eyes look bigger, brighter, and more awake in under a minute.
At Glow16, our tagline is "Timeless Beauty, Endless Glow," and curled lashes are one of the simplest ways to bring that glow to your eyes. Whether you're getting ready for the office, a wedding, or a festive evening, this guide covers everything you need: benefits, types, step-by-step technique, maintenance and how to choose the right curler for you.
Why Use an Eyelash Curler? Key Benefits
1. Instantly Bigger, More Open Eyes
Straight lashes point downward and can cast a shadow over the eyes. Curling lifts them upward, which opens up the eye area and makes you look more rested, even after a short night.
2. Makes Your Lashes Look Longer
A curled lash reveals its full length. Many people notice a clear difference in length before they even apply mascara.
3. Better Mascara Results
Curled lashes give mascara a better base. The formula coats more evenly and is less likely to smudge onto the eyelid or leave marks on your upper lash line.
4. A Natural Alternative to Falsies
If you love a soft, everyday look, curling gives you lift and definition without the effort of false lashes. It also pairs well with the eyeliner, kajol and eyeshadow you may already own.
5. Quick and Budget-Friendly
It takes around 30 seconds per eye and costs far less than lash treatments. For budget-conscious beauty lovers, it's one of the best-value tools in your kit.
Types of Eyelash Curlers: Which One Is for You?
Manual (Classic) Eyelash Curlers
The traditional metal or plastic curler with a rubber pad. You squeeze it to clamp and curl the lashes.
Pros: Affordable, durable, widely available, gives a strong and defined curl
Cons: Needs a little practice; a poor technique can pinch skin or bend lashes
Best for: Beginners, daily use, and anyone who wants a dependable, low-cost tool
Heated Eyelash Curlers
These battery-powered or rechargeable wands warm up (usually to a gentle heat) and are held against the lashes, similar to a mini curling iron.
Pros: Can help the curl hold longer and works well on stubborn, straight lashes
Cons: Costs more, needs batteries or charging, and overheating can damage lashes if misused
Best for: Straight, Asian-type lashes that refuse to hold a curl, and people who like a very natural lift
Safety note: Always follow the maker's instructions, keep the heated tip from touching your skin, and use it on clean, product-free lashes. Never use it after mascara.
Mini or Partial Curlers
Smaller curlers designed for short lashes and tight spots.
Best for: Inner and outer corner lashes, short lashes and smaller or deep-set eyes
Other Variations
Segmented-pad curlers: Use several smaller pads for a more even curve
Curved vs. flatter frames: Choose based on your eye shape (see the guide below)
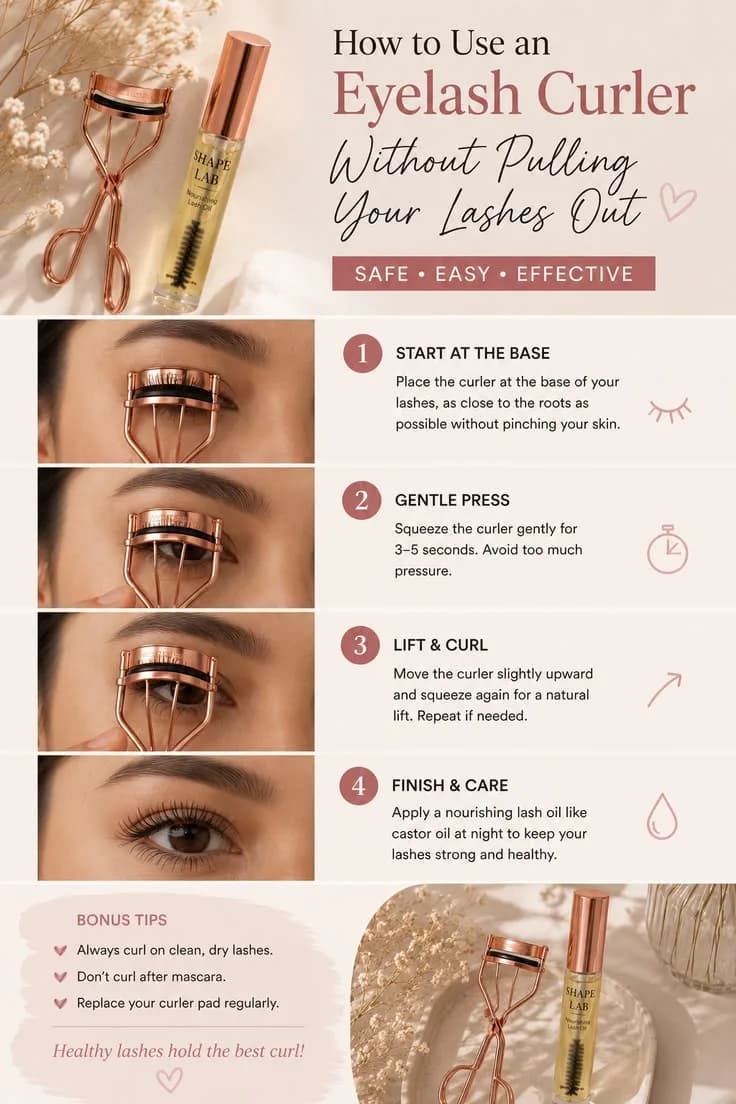
How to Use an Eyelash Curler Correctly (Step by Step)
Follow this simple routine for a long-lasting, natural curl:
Step 1: Start with Clean, Dry Lashes
Curl before mascara, never after. Curling coated lashes can make them stick to the rubber pad and break.
Step 2: Position the Curler
Open the curler and place it at the base of your upper lashes, as close to the lash line as is comfortable. Look down into a mirror and make sure no skin is caught between the pad and the frame.
Step 3: Clamp and Hold
Gently squeeze for 5 to 10 seconds. Don't press so hard that it hurts.
Step 4: Curl in Stages (The Pro Trick)
Instead of one hard squeeze, "walk" the curl upward:
Clamp at the base and hold for 5 seconds
Move slightly higher to the mid-lash and hold for 5 seconds
Finish near the tips and hold for another 5 seconds
This creates a smooth, natural arc instead of a sharp bend.
Step 5: Don't Forget the Corners
Tilt the curler slightly toward the outer and inner corners to lift those small lashes too. A mini curler works well here.
Step 6: Apply Mascara
After curling, apply mascara right away. Wiggle the wand from the roots to the tips to lock in the lift. For extra hold, use a waterproof or curl-holding formula, which is helpful in humid weather.
Using a Heated Curler
Make sure the lashes are clean and dry
Let the curler reach its set temperature
Hold it against the lashes for a few seconds, moving from root to tip
Apply mascara after it cools
Tips for Maintaining Your Eyelash Curler
A curler touches a delicate area, so keeping it clean and in good shape matters for both hygiene and results.
Clean It Regularly
Wipe the metal frame and rubber pad with a soft cloth or a cotton pad after use
Once a week, clean it with a gentle makeup remover or mild soapy water, then dry it completely
Remove built-up mascara residue from the pad, as it can cause lashes to stick and break
Replace the Rubber Pad
This is the most overlooked step. A worn or cracked pad can damage lashes and won't curl properly. As a general rule, replace the pad every 2 to 3 months, or sooner if it's flattened, sticky or split. Many curlers come with spare pads.
Store It Properly
Keep the curler in a clean, dry pouch or case
Avoid leaving it in a damp bathroom, where moisture can encourage bacteria
Store the pad clamp open if possible so the rubber keeps its shape
A makeup pouch keeps it protected from bending or scratching
Heated Curler Care
Wipe the heating tip with a lightly damp cloth once it has cooled
Remove batteries if you won't use it for a long time
Never use it on wet or product-coated lashes
How to Choose the Right Eyelash Curler for You
By eye shape
Eye ShapeWhat to Look ForRound or prominent eyesA flatter curve, which prevents over-curling and gives a softer liftAlmond or deep-set eyesA standard curved curler that follows the natural eye shapeHooded or narrow eyesA smaller or segmented curler that can reach close to the rootMonolid or very straight lashesA curler with a deeper curve, or a heated curler for added hold
By lash type
Short lashes: Choose a mini or small curler
Long, thick lashes: A standard or wide curler will cover them evenly
Sparse lashes: Use a gentle touch and avoid overly heated tools
By budget and lifestyle
On a budget: A good manual curler is all you need
Frequent traveler: Pick a compact curler and a small pouch
Perfectionist: A manual curler plus a heated one lets you customize your look
Quick checklist before buying:
Does the curve match my eye shape?
Is the rubber pad soft and replaceable?
Is the grip comfortable and easy to squeeze?
Does it feel sturdy, with no sharp edges?
Common Mistakes to Avoid
Curling after mascara: Causes sticking, clumping and breakage
Squeezing too hard or too long: Can leave a crease or damage lashes
Curling only the middle of the lash: Leaves a "kinked" look; always curl base, middle and tip
Using a worn-out pad: The leading cause of broken lashes
Never cleaning the tool: Can lead to irritation or eye infections
Using a heated curler too hot or too close to the skin: Always follow the product's guidance
Internal Linking Opportunities for Glow16
"Eyelash curler" → Brushes & Tools › Eyelash Curler
"Mascara" → Eyes › Mascara
"Eyeliner" / "Kajol" → Eyes › Eyeliner / Kajol
"Eyelash & applicator" → Eyes › Eyelash & Applicator
"Makeup pouches" → Brushes & Tools › Makeup Pouches
"Makeup remover" → Face › Makeup Remover
"Beauty blender guide" → Link to the previous Glow16 beauty blender blog
Conclusion: Lift Your Look in Under a Minute
An eyelash curler is a small tool with a big impact. A few seconds of curling can open up your eyes, make your lashes look longer and help your mascara perform better, all without spending much. Combine the right curler with good technique and regular care, and you'll see the difference in every look, from office-ready to wedding glam.
That's what Glow16 is about: Timeless Beauty, Endless Glow, starting with the details.
👉 Ready to lift your lashes? Explore the eyelash curlers, mascaras and makeup tools at Glow16 and build your perfect eye routine today. Visit www.glow16.com to shop now.